Checking blood sugar can feel a bit overwhelming at first. Whether you’re managing a recent diabetes diagnosis or simply curious about your metabolic health, checking your blood sugar level helps you deal with it. It shows you exactly how your meals or stressful meetings actually affect your body.
This guide will help you learn how to check blood sugar at home naturally without feeling overwhelmed. Ready to know your blood sugar instead of guessing. Let’s begin.
Table of Contents
The Importance of Checking Your Blood Sugar Levels
Checking your blood sugar at home is the most effective way to see what is really happening in your body. This will help you:
- See how a meal or a stressful day at work really affects your numbers.
- Get peace of mind knowing your treatment is doing its job.
- Catch a spike or a dip early, before it turns into a bigger problem.
How to Check Blood Sugar at Home Naturally
There are two main ways most people check blood sugar at home:
- Finger‑prick blood glucose meter (glucometer)
- Continuous glucose monitor (CGM)
According to the National Institute of Diabetes and Kidney Diseases (NIDDK), a small drop of your blood from your fingertip is more than enough to check your blood sugar at home. A continuous glucose monitor (CGM) is beneficial for you if you are dealing with diabetes and have to monitor your blood sugar throughout the day and night.
The Centers for Disease Control and Prevention (CDC) also says to check blood sugar using a standard meter or CGM, and that even if you use a CGM, you still need finger-stick checks for accurate blood sugar numbers.
Finger‑Prick Blood Glucose Meter
A blood glucose meter shows how much glucose is present in your blood at that exact moment. It is the most common way to check blood sugar levels at home, even if you are a beginner. You will usually need:
- A blood glucose meter
- Test strips that match your meter
- A lancing device and sterile lancets (small needles)
- A logbook, app, or phone to record results
Continuous Glucose Monitor (CGM)
A continuous glucose monitor (CGM) uses a sensor that is inserted under the skin (often on the arm or abdomen) that measures glucose in the fluid between your cells every few minutes. The sensor sends data to a reader, insulin pump, or mobile phone so that you can know your number and patterns.
Many health authorities, like the NHS, use CGMs and similar systems for people who can’t manage diabetes with the help of the finger-prick tests or who need constant monitoring. However, even with CGMs, finger-stick methods are still often needed to confirm numbers.
Step-by-Step: How to Check Blood Sugar at Home Naturally
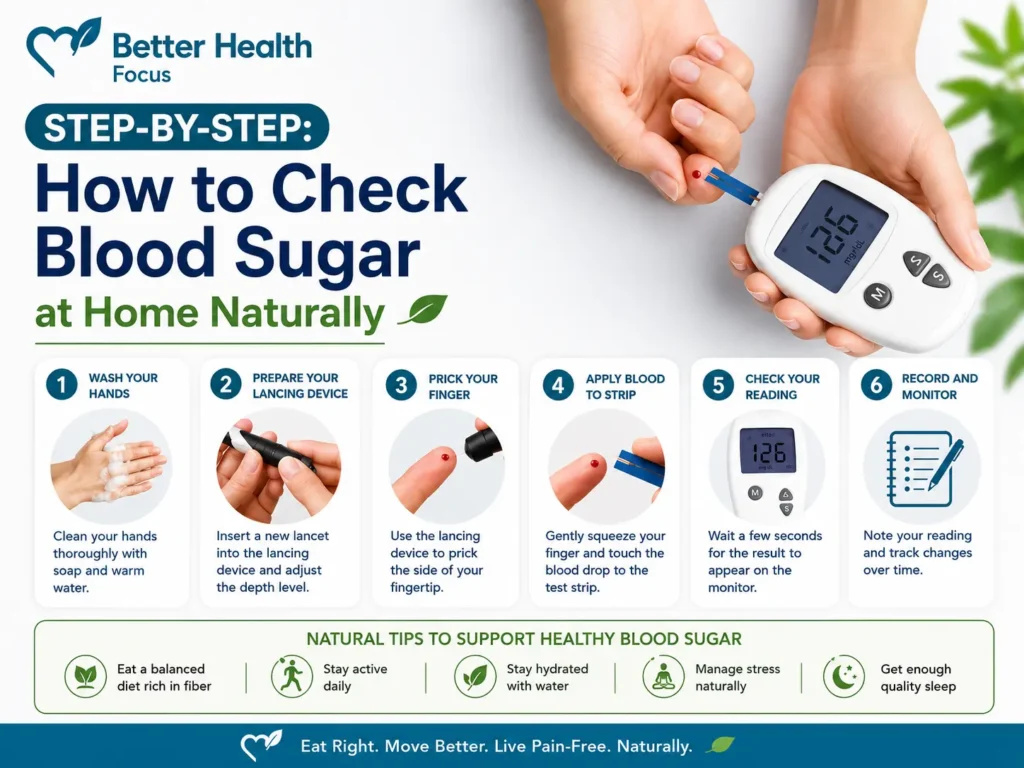
Checking your blood sugar yourself the first time may seem difficult and overwhelming, but with a little practice and proper instruction it is very easy to do. All glucose meters are a little bit different, but the basic instructions are generally the same. Below is a simple step-by-step guide:
Step 1: Gather Everything Needed
The first step is to gather everything you need to check your blood sugar in front of you. You don’t want to be running around for a cotton swab while your finger is bleeding. Make sure you have:
- Your fully charged blood sugar meter.
- A fresh test strip.
- Equip your lancing device with a new needle.
- A clean tissue or cotton swap.
- A safe disposal box.
Step 2: Wash And Dry Your Hands
In this important step you have to wash your hands with warm water and soap and dry them properly.
- Why soap? Hand sanitizers can dry out your skin, and leftover food residue or lotion on your fingers can actually make your sugar reading look falsely high.
- Why dry thoroughly? If your fingers are wet, the water can mix with your blood drop and make your reading look falsely low.
Step 3: Prep Your Meter
Have your device ready to go. Insert a new test strip into your meter. Most modern devices are smart enough to turn on right away once the strip is clicked into place. Just wait a second until the little “ready” symbol or blinking drop icon appears on the screen.
Step 4: Pick a Finger and Prick It
And now the real blood sugar test starts.
- Always aim for the side of your fingertip, right near the nail bed. It hurts a lot less than the soft center pad.
- Rotate which finger you use every day so you don’t build up sore spots or calluses.
- If your hands are cold, let your arm hang down by your side for a moment and gently shake your hand to get the blood flowing. Then, firmly press the lancing device to the side of your finger and click the button.
Step 5: Get a Blood Drop
- Gently rub your finger. It will help to get a blood drop for testing. Try not to squeeze the fingertip too hard because it can affect your results.
- Make sure you get enough blood sample to fill the testing strip on your first try. It saves you from doing it again.
Step 6: Put Blood to the Test Strip
Most modern-day testing strips are designed to automatically collect a blood drop as soon as it touches the strip. All you have to do is:
- Carefully touch the drop of blood with the edge of the testing strip.
- Then the meter will beep and take time to show your result in a few seconds.
Step 7: Wait for the Result
This step involves only waiting for the results of the blood sugar levels. In case of doubts about the results, conduct the test once more after ensuring that you have washed your hands correctly.
Step 8: Record Your Result
Modern-day blood sugar meters automatically save your readings, and some of them can be connected with phones, which helps you record readings easily. It helps you recognize any pattern by checking your previous readings and taking precautions.
According to the CDC, recording your readings can help you make a better plan to manage the condition or find a better treatment.
Step 9: Clean Up Safely
Never use a used lancet. They get dull after one use, which will cause more pain in the next use, and reusing them can lead to infections. Eject the used needle directly into your sharps container or hard plastic bottle and throw away your used strip, and you are all done!
Know Your Blood Sugar Numbers
Even if you know how to check your blood sugar, it’s important to know what those numbers shown in the meter mean. How they reflect your body’s condition. Usually blood sugar levels are measured in mg/dL (milligrams per deciliter).
For most adults with diabetes (not pregnant):
- Fasting blood sugar: 80–130 mg/dl (before meals)
- 2 hours after eating a meal: < 180 mg/dL
For people with no diabetes (general):
- Fasting blood sugar: 70-99 mg/dL
- 2 hours after eating a meal: <140 mg/dL generally
These numbers can vary for everyone due to their health conditions and medications. Always talk to your doctor for better advice & treatments.
When Should I Check My Blood Sugar Level?
I’m sure many people would have the question, “When is the best time to check blood sugar?” But the answer is different for each person, as it is based on their condition, medication, and daily routine. The CDC and Mayo Clinic say the most common times to check blood sugar are
- When you first wake up (fasting), before eating or drinking
- Two hours after the start of a meal
- At bedtime
In some cases, especially if you use insulin or have too much of a drop, you might need to check the following:
- Before, during, and after exercise
- During the night (for example, around 2–3 a.m.), if nighttime lows are suspected
- When you feel symptoms of low or high blood sugar
- More often, when you are sick, changing medicines, or changing your usual routine
Many also have the question of how many times they should check their blood sugar levels. People with type 1 diabetes should check their blood sugar 4-10 times per day, or they should use a CGM for better readings. For people with type 2 diabetes, from a few times to several times a day, depending on their condition and treatment.
Another common question is whether they can check blood sugar with a phone. While you can’t test your blood sugar directly, many modern glucose meters and CGMs can be connected to phone apps. It helps you review your readings and recognize any pattern more easily.
Common Mistakes to Avoid
It is natural for even experts to commit mistakes occasionally. Hence, you need to ensure that you do not make any of these mistakes to ensure accurate readings.
- Storing the Testing Kit
Ensure that you do not expose your testing strips and kit to extreme conditions of temperature and humidity. Also, refrain from storing them in moist places like bathrooms.
- Always Check Your Strips
Always check the expiration date of your strips before using them. Using them after their expiration date can give you wrong data.
- Keep Your Hands Clean Before the Test
Wash your hands properly. The FDA says that things on the skin from other countries can affect test results.
- Always Use a New Lancet
Always use a new lancet for each test. Using needles more than once makes them dull, makes them hurt more, and raises the risk of infection.
- Always Use the Proper Method
Try not to squeeze your finger too hard to get the blood out. If you push too much, it can actually mess with your results and give you a wrong reading. A gentle massage is usually all it takes.
Conclusion
At first, checking your blood sugar at home on your own might seem too difficult, but with a little time and knowledge, it will become very easy. Whether you use a standard glucose meter or modern CGMs, knowing about your numbers eliminates guessing and helps you take care of your body in a better way.
Remember, your numbers never tell you how you are doing. They just help you with adjusting things according to your condition without the need to guess. By following the steps mentioned in this guide, you can check your blood sugar even if you are a beginner and don’t know anything about it.
Frequently Asked Questions
How to check blood sugar at home naturally without a meter?
There is no way to check your blood sugar at home without a meter. To get the exact numbers for your blood sugar, you do need a glucose meter. If you want an alternative to avoid pricking your fingers daily, you can use a continuous glucose monitor (CGM). It will help you know your exact number and notice any patterns.
When is the best time to check blood sugar levels?
The most common times to test are right when you wake up (before you eat anything), right before a meal, two hours after you start a meal, and right before bed. For your personalized timing, talk to your doctor.
Can I really check blood sugar with phone?
Yes, you can, but not directly because the phone itself cannot draw or test blood. However, it can show you numbers and patterns when connected with the glucose meter or CGMs.
How long after eating to check blood sugar?
If you want to see how a meal affects your blood sugar, you should check it exactly two hours after eating your first bite. Two hours gives your body enough time to process the food, giving you better results on tests.
How often do I need to check my blood sugar?
It really depends on your daily routine and your medications. Usually, people with Type 1 diabetes check their levels anywhere from 4 to 10 times a day. If you have Type 2, it varies—some people check once a day, while others on insulin check as often as those with Type 1.
What is the easiest way to check blood sugar at home?
The easiest way to check blood sugar at home is by using a glucometer. Simply wash your hands, insert a test strip into the device, prick your fingertip with a lancet, and place a small drop of blood on the strip. The glucometer will display your blood sugar reading within seconds. Some people also use continuous glucose monitors (CGMs) for real-time glucose tracking without frequent finger pricks.
Which organ is most affected by diabetes?
The pancreas is the organ most directly affected by diabetes because it produces insulin, the hormone that regulates blood sugar levels. However, uncontrolled diabetes can also damage other organs over time, including the kidneys, heart, eyes, nerves, and blood vessels. Proper blood sugar management is important to reduce the risk of diabetes-related complications.
References & Sources
National Institute of Diabetes and Kidney Diseases
CDC: Centers for Disease Control and Prevention

Daniel Brooks
Daniel Brooks is a senior health writer and research editor with more than 20 years of experience covering a broad range of health conditions, treatments, and wellness topics. For Daniel, writing about the latest medical advances and practical health strategies is more than a career—it is a commitment to helping readers live healthier, more productive lives.
He focuses on evidence-based wellness, preventive healthcare, and nutrition science, translating complex medical information into clear, practical advice for everyday readers. His areas of expertise include weight management, metabolic health, digestive wellness, blood sugar support, men’s health, and healthy lifestyle improvement.
Daniel uses a research-first approach, relying on peer-reviewed studies, public health organizations, and clinical guidelines to create accurate and trustworthy content. At Better Health Focus, he oversees topic research, source verification, and article development, ensuring each guide is informative, current, and easy to understand.